Wednesday 30 January 2013

Pic Of The Week 4

I wonder how long before we all forget Lyd once looked like this?


This shot by Chris Nevard for Model Rail magazine shows our Backwoods Manning Wardle in charge of a Up train at the front left hand corner of the layout.

I maintain this spoof BR black livery suits her much better than the proper Southern colour scheme she wears currently.

Because she's technically a new locomotive, rather than a replica of one of the oringinal L&B engines, it is a moot point, is it not, whether there is any such thing as a 'proper' livery for her?

Monday 28 January 2013

121 Gets A Roof

There's a theme developing of stalled modelling projects getting restarted around here.

While I've been tinkering with the tamper I'm building for a client and doing the last jobs on my trio of DZ wagons, Himself has finally got around to rolling a brass roof for our model of the 2nd 'Superbarn' 121.


As you will discover from previous posts on this blog on the subject of superbarns, I've decided to take a different approach with 121 than I did with my model of 103.

On the first carriage I managed to make the roof using my usual technique with styrene - described on the How We Build Our Carriages page here on the blog - but it was a bit of a hassle.

The challenge is the way the superbarn design has inset doors at the end but without the flat roof section above the way the modern WHR carriages do, which means there is nothing to support or give any 'spring' to the roof skin at this point.

Fitting a brass skin solves these issues.


Brass is not my favourite material to work with, mainly due to lack of practise I suspect. To use a good Scots word I quite often get into a fankle with it.

Himself, however, most definitely has the knack, and I'm very pleased with the way 121 has turned out and shall be sending 108 to him for the same treatment whenever I get around to building it.


Saturday 26 January 2013

By Way Of Demonstration

I've been busy making some hybrid wagons.

My friend at Narrow Planet, Steve, has very kindly offered to display my kits on his stand at the Beds & Bucks 009 Society open day this weekend.

As my range has expanded in recent weeks to include two types of B wagon and a choice of DZ wagon styles I've decided to make a couple of special demo wagons that show the options available.

So, as you can see below, I have made a B wagon where one side is standard SAR wagon with the usual centre door arrangement, but on the other side its been done up as a WHR bike wagon.

The DZ wagon (which is made with the latest riveted castings) sports both a full height SAR end and one of the cut down ends which the WHR wagons came with.


There will also be an example of the work-in-progress NGY ballast wagon kit on the Narrow Planet stand for visitors to have a look at too.


Thursday 24 January 2013

Pic Of The Week 3

This is a scene you are unlikely to see ever again on the FR.


I know I am not alone in mourning the removal of the passing loop - and more importantly - the signal box at Dduallt.

Yes, you can still see two trains there during gala events when one is locked in the dead end old Down platform, but you could not recreate this 'over and under' moment any more because Dduallt is now in the slap bang in the middle of the Tan y Bwlch to Tanygrisiau block section and so you can only have one train in section at a time.

What a shame it does not still have a signal box and a system with short and long section tokens like Rhiw Goch.

Tuesday 22 January 2013

Improving The Breed

My DZ masters have gone all spotty.


Following successful experiments with the resin rivet transfers in the silicone moulds for the NGY and B wagon kits I am retro-fitting the masters for my first kit release, for the DZ wagons.

The 3rd generation of these kits will come with cast rivet heads and also the option of the more common, larger SAR ends. (The examples on the WHR were cut down level with the top of the side doors.)

The picture shows them with a box built around them ready for the RTV moulding rubber to be poured on.

Sunday 20 January 2013

Suffering For My Art

I am typing this post with mild burns on my finger tips following a session at the workbench fulfilling one of my New Year Resolutions: to get the KMX Tamper I am making for a client finished at some point in 2013.

To this end I have been fabricating the hydraulic pipe runs - which are a very prominent feature on one side of the machine - out of brass wire and strip soldered together, which is where the burning of the fingers occurs.


For the pipes I use picture hanging wire which I untwist into single stands. 

(I got a bit of a strange look from the assistant in the DIY shop in town when I went in to buy it. "How heavy is the picture?" she asked in all innocence, and appeared rather confused when I explained that I didn't actually want to hang any pictures with it.)

The strips of brass, representing the big clips holding the pipes in place on the real KMX, are snipped from leftover frets from my SAR bogie etches. Well, waste not - want not, and all that.


It's quite a fiddly process because you never get the strands of wire perfectly straight after they've been untwisted and so it takes quite a lot of coaxing to get them to lie next to each other and as a consequence I have to hold them qute close to the point where the solder has to be applied to make sure they don't wander off on their own accord during the process - hence the slightly singed digits.


You may wonder why I don't use brand new wire of a suitably small gauge, but I find the picture wire is better for getting the unruly look of the pipe runs on the real thing than starting off with perfectly straight, brand new wire.

Friday 18 January 2013

B Prepared

While my wait continues for the etches for Bettendorf bogies to appear I have found myself scratching around for useful things I can be doing.

I'm reluctant to launch into a big new project only to find I have to drop it halfway through if the bogies turn up out of the blue.

So I've been busying myself casting the parts for the first tranche of B wagon orders.

These are the parts for one pair:


Unfortunately I dont' have the option of doing the same and trying to get ahead of the game with the NGY ballast wagons - much as I would like to - because it won't be just the bogies which are being etched but also the cogs and brackets of the ballast door mechanism and I can't be 100% sure that I will not have to re-design any of the cast parts after I have had to the chance to try out the brass bits on my prototype wagon.


Wednesday 16 January 2013

Pic Of The Week 2

A really delightful scene for the second of our shots by Chris Nevard, as Earl of Merioneth drifts down the spiral.


Doesn't she look fantastic with the red rods and the white rims on the wheels? Classic 1980's FR - except she's got a very Noughties set of carriages in tow.

This is not a view of the sprial you would ever get in reality, unless you brought along an off-road cherry picker, because the ground falls away to the east of the embankment.

It's one of my favourite pictures from the shoot and I think it shows off what a fantastic job Himself did on the scratch built body of 'The Square'.  He really captured the essence of this beast.

The Earl is surely up there with the Gresley A4's and Stainer's streamlined Duchesses in being 'of it's time'.

Monday 14 January 2013

Letter From America

Running out of supplies when you're halfway through a project is always annoying.

It is even more irritating if the trader you use has an erratic turnaround time on your order. It's nice when you order something online to be confident about knowing when you're going to get your bits.

That's why I always order my resin rivet transfers direct from the makers, Archer, in the USA even though I have seen some traders selling them at exhibitions in the UK.

Their delivery performance is really very impressive considering where there are based and how little it costs - $3 air mail -  and they generally arrive here in less than 5 working days.

In fact, I recently ordered some components from a UK based firm and transfers from Archers, on the same day, and their package reached me from the States many days before the item from our own wee island.


What I need them for is to complete my own fleet of DZ wagons for Bron Hebog.

I've got 3 wagons to rivet up. I'd completed 4 out of the 6 sides when I ran out of the right size of rivets.

Now this package has arrived I can get on with finishing them off.

Himself is due to come to see us in Scotland in a couple of weeks so I hope to be able to hand them over to him them to take back and paint.

Saturday 12 January 2013

Destination Dinas

We are delighted to have been asked to show Bron Hebog at the WHR Superpower event in September.

It will be the layout's second appearance in Gwynedd having been shown, in a very embryonic state, at an exhibition in Porthmadog back in 2009.

Hopefully Himself will be able to find some time - in between stints in Wales volunteering on the real FR /WHR - to progress the layout beyond how it was shown at exhibitions in 2012.


The whole team will have a role to play in this extension. The Artistic Director (Francis) is working on plans for the models of the Oberon Wood houses at the southern end of the station, below Goat Cutting, and as soon as I get my paws on them I will crack on with building them.

And Himself is the process of getting the builders in to extend his workshop. When that project's completed he will have room to put up more of the layout at any one time, so its hoped that will accelerate progress.

We all look forward to seeing you in September.

Thursday 10 January 2013

Pic Of The Week

I'm introducing a new weekly feature for the blog for 2013.

For most of the last two years regular readers have enjoyed (I hope?) the Model Of The Week posts showcasing items from our collection of locomotives and rolling stock we've built up over the last 20 years.

But for the moment the well has run dry, not because of a shortage of models but due to a lack of decent photos of the ones that haven't been featured yet.

So instead I've decided to give you a chance to take another look at the amazing pictures of our first 009 layout Dduallt taken by Chris Nevard last year in the shoot for Model Rail magazine.

It's getting on for six months since I first saw these images and they still blow me away every time.

I am amazed at the way Chris has managed to make such small and relatively crude models look so lifelike employing nothing more than innate skill in the use of a camera and lighting - and just a hint of computer wizardry on the smoke effects.  I feel very privileged indeed that we were able to have him come and train his lens on our layout - and someone else paid for it!

So let's start off with a shot of Merddin Emrys setting off north from a station stop:


I'll be posting another of the pictures next week and they will eventually all go up in a gallery on the blog.


Tuesday 8 January 2013

Bend & Twist

Do you find that you get 98% of a model done and then it sits on the shelf for months before you finally get around to doing all the little jobs needed to complete it? I do.

My 3 DZ wagons for Bron Hebog are a classic example of this.

The missing items were rivets (now in progress) and vacuum pipes.

Making vacuum pipes is one of my modelling pet hates and so it usually gets left until the point where my irritation at seeing an incomplete model on the shelf above my desk exceeds the disinclination to pull out the soldering iron and the brass wire and make some.

One of the DZ's - 1412, I think - has been recently rebuilt at Boston Lodge with new removable ends, and a unique under slung pipe arrangement, so there is no upright in the way of any loads that may hang over the end of the wagon.


It took a lot of trial and error, bending, straightening and re-bending to coax the 0.7mm brass wire into something which looked vaguely like the serpentine shape of these 'bags'.

The next step was to replicate the flexible hose, which we do by demolishing the coils from a Peco point motor and twisting the very thin copper wire in a tight spiral around the bent brass.

I believe that when Himself makes the pipes he twists the copper around a straight length before bending it into a vac bag shape.

I've tried doing it this way but found that I either end up flattening the copper twists in the jaws of my pliers or the spirals spread apart as the brass is bent.

So now I shape the brass wire first and then twist the fine copper wire around it.

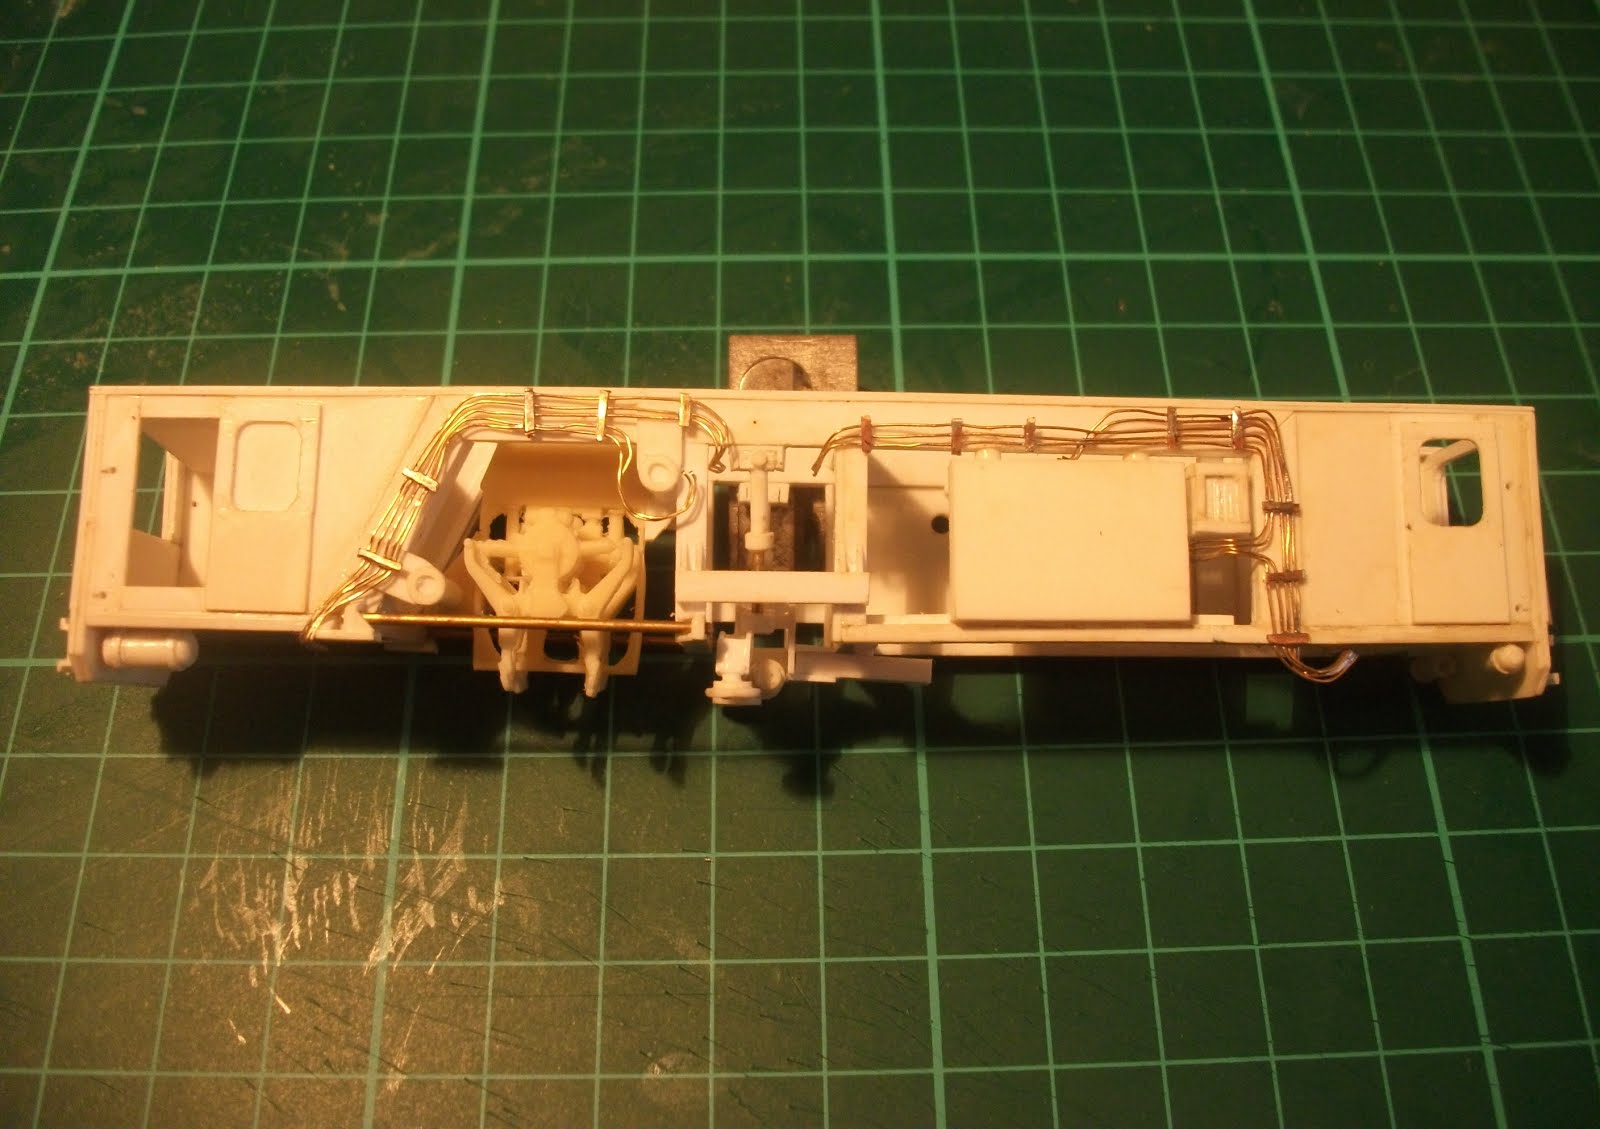
Here is the wagon with the vac bags in place at both ends and a connecting run of brass wire.


Sunday 6 January 2013

Dot To Dot

Applying rivet transfers is one of those tasks that requires total concentration and which really clears the mind and relaxes the body - or at least I find it so.

While the family were otherwise amusing themselves for an hour or so (a rare event as most of my modelling is confined to the hours when I've got the house to myself) I dug out my pack of Archer's rivets and stuck them onto one side of one of my DZ wagons destined to join the Bron Hebog fleet.


As you can see there are quite a lot of them.

The long runs along the top of the doors are the simplest. It's the messing about with the door hinges and all the little groups and odd ones and twos along the bottom frame that takes the time.

Here's a shot of it with all of them in place.


By this time I was started to get a little cross-eyed and so it's probably just as well that I've decided to let these dry for a day or two, and then I will give them a coat of clear varnish, before I tackle the other side.

The last thing I want is to turn it over without them fixed firmly in place because there's a real risk I will end up knocking some of them off as I work on the other side.

Were that to happen riveting would most certainly no longer be a relaxing and soothing job...

Friday 4 January 2013

DZ Derivative

I do my best to keep my customers happy. For many weeks now some of them - you know who you are - have been politely but persistently badgering me to produce alternative ends for the DZ wagon kit to represent the more common version seen in South Africa.

These are taller with a slope at each side at the top which make the look much more like mini B wagons.

I've finally got around to knocking up a master. Here it is next to one of the WHR-style ends.


It is yet to have its resin rivet transfers applied, but work is advanced enough for it to break cover and for me to be able to announce that when the next batch of DZ kits are produced customers will be able to order them with either type of end.

Wednesday 2 January 2013

B Wagon With Extra Brass Bits

I managed to sneak away to the modelling bench for a few minutes during the festive season to put the finishing touches to the first of my resin B wagons.

This involved drilling out the small holes marked in the casting along the frame and creating the grab rails out of 0.5mm brass.


There's quite a lot of them - 14 in all.

The final touches are the hexagonal hand brake wheels - the B wagons on the WHR have retained them at both ends, it seems, unlike the DZ's - and the door stops that hang down in the middle from the frame.


These are not the delicate castings that you'll find on my DZ kits but instead is a bent strip of metal bolted on to the frame. (A lot of the DZ's had this type of stop too). I created mine by the simple expedient of snipping a bit of the waste brass from the brake gear fret, bending them in the jaws of my pliers and super-gluing them on.

That's pretty much all I can do on the B wagon project for now until the test etches for the Bettendorf bogies arrive.